|
Setup:
1. Give each player 1 Blue Villager Die.
2. Roll to see who will be the Monster for the 1st Round.
3. Give the Monster one Green Die for each Villager they face.
4. Give each player an even number of Life Tokens from the Token Bag.
5. Shuffle the Ward Cards and deal 3 Cards to each Player.
6. Place the Void. |
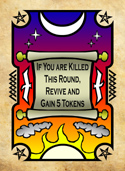 This is a Spell Ward Card
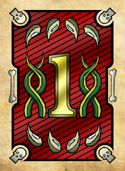
 This is a Villager Ward Card
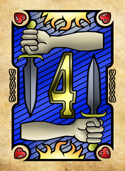
 This is a Monster Ward Card If there are multiple Scroll Cards, start with the Monster's first, and then go around the table to the Monster's left until every Scroll card is accounted for.
|
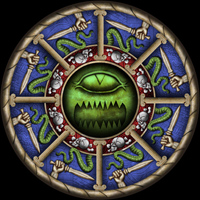
Before we start the game steps, let's first look over the board. You'll see there are 3 distinct areas to the Cursed gameboard (The Mythical Tablet).
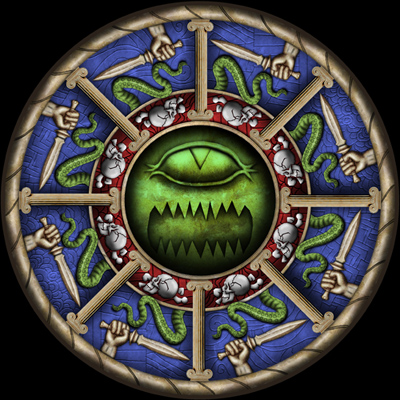
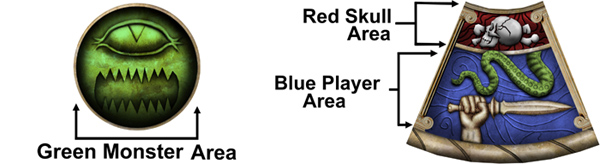
On the outer most ring is the Blue Villager sections, which are 8 areas separated by marble columns. When you start the game, you claim one of these 8 sections as your personally space, which is covered below. When you are the Monster, you ignore this space, using the Green section instead, but you still retain the Red Skull section and the rights to this Blue section for use when you're back to being a Villager again.
Above that are the Red Skull areas. These couple with the blue area below to become your personally playing space. You still use this space when you are the Monster as well.
And in the dead center is the all-consuming Green Monster area, which is reserved for use by whomever is the current Monster.
1st Step – Cover your Skull
 . Every player, Monster and Villagers, must put one Token in a Red Skull Slot, closest to them. This shows you're still Alive! . Villagers Roll their Die Openly, for all to see.. Monster Rolls their Dice Privately (Preferably using the larger of the 2 steel cups, or some other visual obstruction) . If you have any, each player has the option to play one Ward Card, Face Down, in front of them, before battle! . Villagers may show other Villagers their Wards, but should never show the Monster. . Ward cards should be tucked slightly under the Game Board to show they are in play. . The Monster adds as many tokens as their wish to the Green Monster Center of the gameboard.
. Monster can add as many, or as few Tokens as they wish. Or skip adding Tokens and move on to Step 5 immediately, should they find their rolls to be weak and not wish to bluff the Villagers into Fleeing. . Never flee too soon! If the Villager Rolls are poor, they might allow you to win by Fleeing themselves! . Villagers must match the Monster's Tokens as a group, not individually.
. The total number of Tokens in all of the Blue areas combined must equal total number in the Green area. . Villagers add their Tokens to their individual blue sections, corresponding to the Red Skull they covered. . Any or All Villagers can match the Monster's Tokens. If no one wishes to match, then all Villagers are forced to Flee. . If the Villagers have nothing left to match the Monster, then move on to Step 5. The Monster can NOT force the Villagers to flee, only force them to bet all they have.. The Monster may continue to add Tokens to the Green Center Area for as long as they have Tokens to do so, or stop at any time, and move on to Step 5.
. If either side has run out of Tokens, move on to step 5.. Villagers or Monster can flee at anytime should they decide they do not wish to risk anymore in the round.
. Treat fleeing the same way you'd treat any lose.. The Monster is under no obligation to show their Dice if the Villagers flee. . As Fleeing marks the end of the round, discard all used Ward cards, even if no betting occurred.
. The Monster reveals his Dice, and all players flip over their played Ward Cards. . When counting Ward Card effects, start with Monster and then go clockwise around the board.. If the Villagers are more powerful, all of the Monster's board tokens go into the “The Void” Cup. Unless a Ward Card allows it, the Villagers never gain Health, only the Monster can. Villagers can only retrieve their own tokens. . If the Monster's points are greater or equal to the Villagers, he/she claims ALL Tokens on the board, including the All Red Skull tokens. The Monster wins ALL Ties! The Monster sweeps the entire board of Health into their pile! (optional evil laugh) . Only the MONSTER can claim the board tokens. Villagers only lose or break even. . Place all used Ward Cards, face up, in the Discard pile. . If anyone has run out of Tokens, they die. Discard all of their Ward Cards. . Should the second to last Villager die, the Monster devours the last Villager. Monster wins ALL Ties! . Should the Monster die, the next player becomes the new Monster.
. Should the Monster die when only 3 players remain, the next player becomes the Monster and devours the last Villager. Again, the Monster wins ALL Ties!
. If a Ward card rewards a player without specifying a source, take the Tokens from the Token Bag.. Ward Cards are NEVER Free! You pay for them with your LIFE! . Ward Cards cost 1 Life Token and you can spend all but 1 of your Life Tokens on them.. Tokens used to buy Ward Cards are returned to the Token Bag, not The Void. (There is a “Claim Void” card). The player on the Monster's Left becomes the new Monster. . The old Monster hands the Monster Dice and Cup over to the new Monster.. The old Monster retrieves their Villager Die and becomes a Village once more.. Ward Cards and Life Tokens can NOT be shared between players!
. Every player, Monster and Villagers, must put one Token in a Red Skull Slot, closest to them. This shows you're still Alive! . Villagers Roll their Die Openly, for all to see.. Monster Rolls their Dice Privately (Preferably using the larger of the 2 steel cups, or some other visual obstruction) . If you have any, each player has the option to play one Ward Card, Face Down, in front of them, before battle! . Villagers may show other Villagers their Wards, but should never show the Monster. . Ward cards should be tucked slightly under the Game Board to show they are in play. . The Monster adds as many tokens as their wish to the Green Monster Center of the gameboard.
. Monster can add as many, or as few Tokens as they wish. Or skip adding Tokens and move on to Step 5 immediately, should they find their rolls to be weak and not wish to bluff the Villagers into Fleeing. . Never flee too soon! If the Villager Rolls are poor, they might allow you to win by Fleeing themselves! . Villagers must match the Monster's Tokens as a group, not individually.
. The total number of Tokens in all of the Blue areas combined must equal total number in the Green area. . Villagers add their Tokens to their individual blue sections, corresponding to the Red Skull they covered. . Any or All Villagers can match the Monster's Tokens. If no one wishes to match, then all Villagers are forced to Flee. . If the Villagers have nothing left to match the Monster, then move on to Step 5. The Monster can NOT force the Villagers to flee, only force them to bet all they have.. The Monster may continue to add Tokens to the Green Center Area for as long as they have Tokens to do so, or stop at any time, and move on to Step 5.
. If either side has run out of Tokens, move on to step 5.. Villagers or Monster can flee at anytime should they decide they do not wish to risk anymore in the round.
. Treat fleeing the same way you'd treat any lose.. The Monster is under no obligation to show their Dice if the Villagers flee. . As Fleeing marks the end of the round, discard all used Ward cards, even if no betting occurred.
. The Monster reveals his Dice, and all players flip over their played Ward Cards. . When counting Ward Card effects, start with Monster and then go clockwise around the board.. If the Villagers are more powerful, all of the Monster's board tokens go into the “The Void” Cup. Unless a Ward Card allows it, the Villagers never gain Health, only the Monster can. Villagers can only retrieve their own tokens. . If the Monster's points are greater or equal to the Villagers, he/she claims ALL Tokens on the board, including the All Red Skull tokens. The Monster wins ALL Ties! The Monster sweeps the entire board of Health into their pile! (optional evil laugh) . Only the MONSTER can claim the board tokens. Villagers only lose or break even. . Place all used Ward Cards, face up, in the Discard pile. . If anyone has run out of Tokens, they die. Discard all of their Ward Cards. . Should the second to last Villager die, the Monster devours the last Villager. Monster wins ALL Ties! . Should the Monster die, the next player becomes the new Monster.
. Should the Monster die when only 3 players remain, the next player becomes the Monster and devours the last Villager. Again, the Monster wins ALL Ties!
. If a Ward card rewards a player without specifying a source, take the Tokens from the Token Bag.. Ward Cards are NEVER Free! You pay for them with your LIFE! . Ward Cards cost 1 Life Token and you can spend all but 1 of your Life Tokens on them.. Tokens used to buy Ward Cards are returned to the Token Bag, not The Void. (There is a “Claim Void” card). The player on the Monster's Left becomes the new Monster. . The old Monster hands the Monster Dice and Cup over to the new Monster.. The old Monster retrieves their Villager Die and becomes a Village once more.. Ward Cards and Life Tokens can NOT be shared between players! If you play a Villager Ward Card when you're the Monster, it will HURT your score. The same goes for Villagers playing Monster Ward Cards. So you can't use those cards as an added Bluff. All card effects are counted, no matter who plays them!
Ward Cards are the only means for the Villagers to bluff a Monster. Don't be afraid to play a low-score altering card against whomever is currently playing the Monster. All unknown Ward cards are powerful! There are some Scroll Wards that can flip the game. So don't be afraid to use this fact to your advantage when bluffing.
NEVER run too soon! In fact, if you're the Monster, don't let on in the least if you're rolls are terrible. This game is all about bluffing. If you have nothing, but the Villager rolls aren't great, let the Villagers talk themselves into running. You'll be amazed how often people will run when they should have fought. (There is a Life Lesson in there)
If you're going to play a good Ward Card against the Monster, make certain to let your fellow Villagers know. It could save them making costly mistakes with their own cards.
Don't show your fellow Villagers ALL of your cards. Sure, it's good to strategize and show them the card you plan on playing that round, but sooner or later, those Villagers will be your enemy. Don't let show everyone everything you have. Your secrecy might save your butt later! (Another Life Lesson)
Don't be afraid to flee. Sometimes a small lose is MUCH better then a large one.(More Life Lessons!)
Once the game is down to 3 players (1 Monster and 2 Villagers), PROTECT YOUR FELLOW VILLAGER!!!! The goal of the game isn't to have the most Tokens, it's to be the last person standing. You can LOSE a game with a huge pile of Tokens, assuming the last of your fellow Villagers fell in the same round you were a Villager. The Monster wins ALL ties. Keep that Villager alive... at least until it's your turn to be the Monster. (Nom-Nom-Nom) >:D
Back to the Main Page